23 - Flagship 1 Task
Virtualization is the easiest way to create a testing environment. In this case, these instructions reflect the usage of the free VirtualBox tool. VirtualBox can be downloaded from https://www.virtualbox.org/. If you are using a computer maintained by your organization’s IT, you must make an installation request to the IT. It is recommended to install a VirtualBox extension. The VirtualBox extension pack provides support for, but is not limited to, USB 2.0 and USB 3.0 devices, and display scaling to suit your system configuration.
Usernames and passwords
Kybereo Linux Username: root , Password: CyberSec4Europe
Kybereo WordPress Username: admin , Password: CyberSec4Europe
Kybereo WordPress admin site: https://www.kybereo.ch/wp-admin/
Kali Linux Username: kali , Password: kali
Remember to change Kali root password at your first login. The default password is common information. It is best practice to change default passwords.
Download paths
Kybereo image can be downloaded from: https://filesender.funet.fi/?s=download&token=7b38e4ba-7667-4936-9cfd-9f1a2a27fca0
Kali image can be downloaded from: https://www.offensive-security.com/kali-linux-vm-vmware-virtualbox-image-download/
Install VirtualBox
- Download latest version of VirtualBox
- Install VirtualBox
- Download VirtualBox Extension Pack
- Start VirtualBox with admin rights and install Extension pack (Figure 01. and 02.)
- OPTIONAL. Change "Default Machine Folder" on VirtualBox - File - Preferences - General (this is the folder where VirtualBox installs images)
| Figures: Install VirtualBox |
|---|
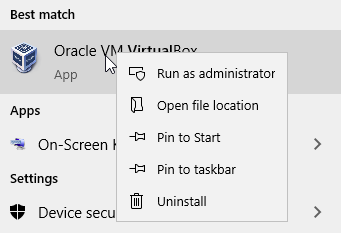 Figure 01. How to start VirtualBox with admin rights |
 Figure 02. How to add extension pack on VirtualBox |
Setting up Kybereo image
- Download Kybereo image file (.ova). Download URL is shown at the top of this page
- Start VirtualBox
- Import Kybereo file to VirtualBox (File - Import appliance)
- Select the image path (your download path location) and click next (Figure 03.)
- On Appliance settings, change machine base folder if needed and click Import (Figure 04.)
- Get a cup of tea or coffee. The image import takes a few minutes.
- When the import is ready, you can start Kybereo by mouse or a key press (Figure 05.)
Tip
If you click the Kybereo virtual machine window with your mouse, the mouse pointer disappears because the virtual machine has captured the mouse pointer. Right CTRL releases locked window and the mouse capture, and the mouse will work again.
| Figures: Setting up Kybereo image |
|---|
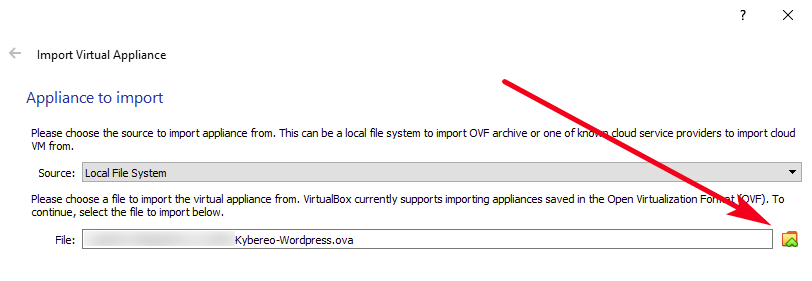 Figure 03. Select image path (your download path location) and click next |
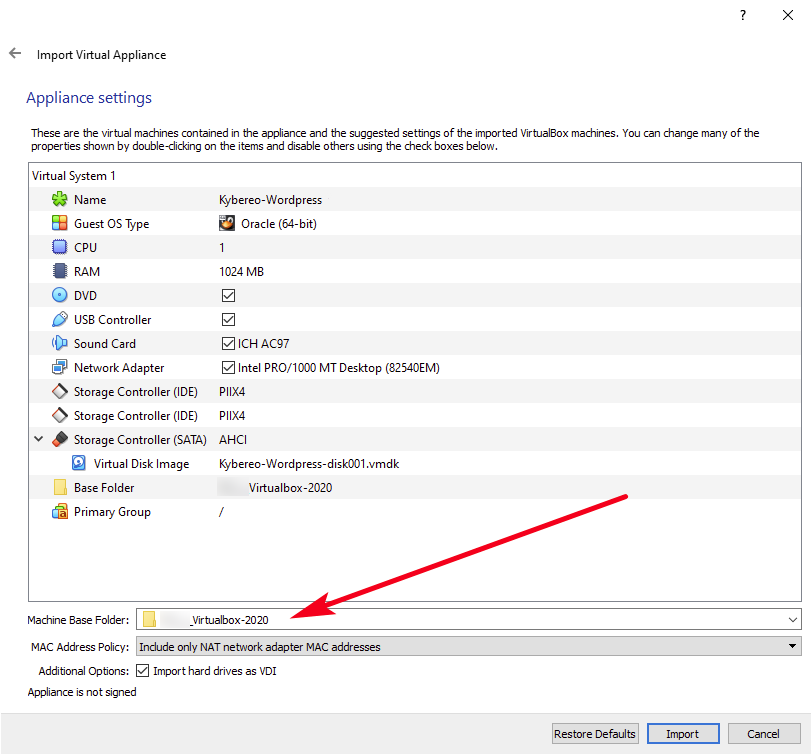 Figure 04. Change machine base folder if needed and click Import |
 Figure 05. When the import is complete, you can start Kybereo by mouse or a key press |
Setting up Kali image
- Download Kali image file (.ova). Path can be found at the top of this page. Please remember to select right version on virtualization environment (Figure 06.)
- Start VirtualBox
- Import Kali file to VirtualBox (File - Import appliance)
- Select image path (your download path location) and click next
- On Appliance settings, change machine base folder if needed and click Import
- Wait for a couple of minutes while the image is installed into VirtualBox
- When the import is ready, you can start Kali by mouse or a key press (Note: Now Kali will work and it is probably connected to the public Internet. On page 34 - Flagship 1 Task we are going through network settings)
| Figures: Setting up Kali image |
|---|
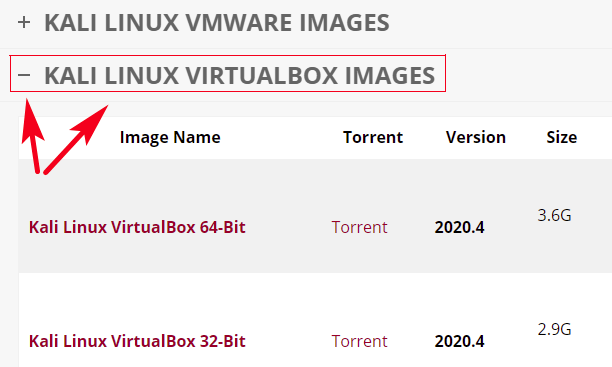 Figure 06. When you are downloading Kali, remember to select VirtualBox version. Then select either 64- or 32-bit version |